> ## Documentation Index
> Fetch the complete documentation index at: https://private-7c7dfe99-vortex-format.mintlify.site/llms.txt
> Use this file to discover all available pages before exploring further.

> 将 Postgres 无缝连接到 ClickHouse Cloud。

# 从 Postgres 向 ClickHouse 摄取数据（使用 CDC）

export const Image = ({img, alt, size = "lg"}) => {
  const normalizedSize = ["sm", "md", "lg"].includes(size) ? size : "lg";
  return <div className={`ch-image-${normalizedSize}`}>
      <Frame>
        <img src={img} alt={alt} />
      </Frame>
    </div>;
};

export const BetaBadge = ({link, galaxyTrack, galaxyEvent}) => {
  if (link) {
    return <a href={link} target="_blank" rel="noopener noreferrer" className="betaBadge" onClick={galaxyTrack && galaxyEvent ? galaxyOnClick(galaxyEvent) : undefined}>
                <span>Beta</span>
            </a>;
  }
  return <a href="/zh/reference/settings/beta-and-experimental-features#beta-features" className="betaBadge">
            <span>Beta 版功能</span>
        </a>;
};

您可以使用 ClickPipes 将源 Postgres 数据库中的数据摄取到 ClickHouse Cloud。源 Postgres 数据库既可以托管在本地环境中，也可以托管在云端，包括 Amazon RDS、Google Cloud SQL、Azure Database for Postgres、Supabase 等。

Postgres ClickPipes 可以通过 ClickPipes UI 手动部署和管理，也可以使用 [OpenAPI](/zh/integrations/clickpipes/programmatic-access/openapi) 和 [Terraform](/zh/integrations/clickpipes/programmatic-access/terraform) 以编程方式部署和管理。

<div id="prerequisites">
  ## 前置条件
</div>

开始之前，你需要先确保 Postgres 数据库已正确配置。根据你的源 Postgres 实例，可以参考以下任一指南：

1. [Amazon RDS Postgres](/zh/integrations/clickpipes/postgres/source/rds)

2. [Amazon Aurora Postgres](/zh/integrations/clickpipes/postgres/source/aurora)

3. [Supabase Postgres](/zh/integrations/clickpipes/postgres/source/supabase)

4. [Google Cloud SQL Postgres](/zh/integrations/clickpipes/postgres/source/google-cloudsql)

5. [Azure PostgreSQL 灵活服务器](/zh/integrations/clickpipes/postgres/source/azure-flexible-server-postgres)

6. [Neon Postgres](/zh/integrations/clickpipes/postgres/source/neon-postgres)

7. [Crunchy Bridge Postgres](/zh/integrations/clickpipes/postgres/source/crunchy-postgres)

8. [通用 Postgres 源](/zh/integrations/clickpipes/postgres/source/generic)，如果你使用的是其他 Postgres 提供商，或自托管实例。

9. [TimescaleDB](/zh/integrations/clickpipes/postgres/source/timescale)，如果你在托管服务或自托管实例上使用 TimescaleDB 扩展。

<Warning>
  PgBouncer、RDS Proxy、Supabase Pooler 等 Postgres 代理不支持基于 CDC 的复制。请务必不要在 ClickPipes 设置中使用它们，而应填写实际 Postgres 数据库的连接信息。
</Warning>

源 Postgres 数据库配置完成后，你就可以继续创建 ClickPipe。

<div id="creating-your-clickpipe">
  ## 创建你的 ClickPipe
</div>

请确保你已登录到 ClickHouse Cloud 账户。如果你还没有账户，可以在[这里](https://cloud.clickhouse.com/)注册。

[//]: # "   TODO update image here"

1. 在 ClickHouse Cloud 控制台中，前往你的 ClickHouse Cloud 服务。

<Image img="https://mintcdn.com/private-7c7dfe99-vortex-format/Kj4wT80mHNH7Aczn/images/integrations/data-ingestion/clickpipes/cp_service.webp?fit=max&auto=format&n=Kj4wT80mHNH7Aczn&q=85&s=28f21bdc220ebac1a2802365b87fb78c" alt="ClickPipes 服务" size="lg" border width="1184" height="482" data-path="images/integrations/data-ingestion/clickpipes/cp_service.webp" />

2. 在左侧菜单中选择 `数据源` 按钮，然后点击“设置 ClickPipe”

<Image img="https://mintcdn.com/private-7c7dfe99-vortex-format/Kj4wT80mHNH7Aczn/images/integrations/data-ingestion/clickpipes/cp_step0.webp?fit=max&auto=format&n=Kj4wT80mHNH7Aczn&q=85&s=275437c400afd56e6808a20a266c9d7a" alt="选择导入" size="lg" border width="2606" height="790" data-path="images/integrations/data-ingestion/clickpipes/cp_step0.webp" />

3. 选择 `Postgres CDC` 卡片

   <Image img="https://mintcdn.com/private-7c7dfe99-vortex-format/mRaTj__cZTg8Xed9/images/integrations/data-ingestion/clickpipes/postgres/postgres-tile.webp?fit=max&auto=format&n=mRaTj__cZTg8Xed9&q=85&s=504892c7252852e609adb16aac090786" alt="选择 Postgres" size="lg" border width="2612" height="892" data-path="images/integrations/data-ingestion/clickpipes/postgres/postgres-tile.webp" />

<div id="adding-your-source-postgres-database-connection">
  ### 添加源 Postgres 数据库连接
</div>

4. 填写您在前置条件步骤中配置的源 Postgres 数据库连接信息。

<Info>
  在开始添加连接信息之前，请确保您已在防火墙规则中将 ClickPipes IP addresses 加入白名单。您可以在[此处](/zh/integrations/clickpipes/home#list-of-static-ips)查看 ClickPipes IP addresses 列表。
  更多信息，请参阅本页[顶部](#prerequisites)链接的源 Postgres 设置指南。
</Info>

<Image img="https://mintcdn.com/private-7c7dfe99-vortex-format/mRaTj__cZTg8Xed9/images/integrations/data-ingestion/clickpipes/postgres/postgres-connection-details.jpg?fit=max&auto=format&n=mRaTj__cZTg8Xed9&q=85&s=052c2a7e35b3ab1a0c659f9410720a28" alt="填写连接信息" size="lg" border width="1862" height="1628" data-path="images/integrations/data-ingestion/clickpipes/postgres/postgres-connection-details.jpg" />

<div id="optional-setting-up-aws-private-link">
  #### &#x20;(可选) 设置 AWS Private Link
</div>

如果您的源 Postgres 数据库托管在 AWS 上，可以使用 AWS Private Link 连接到该数据库。这在您
希望保持数据传输私有时非常有用。
您可以按照[设置指南来建立连接](/zh/integrations/clickpipes/aws-privatelink)进行操作。

<div id="optional-changing-tls-settings">
  #### &#x20;(可选) 修改 TLS 设置
</div>

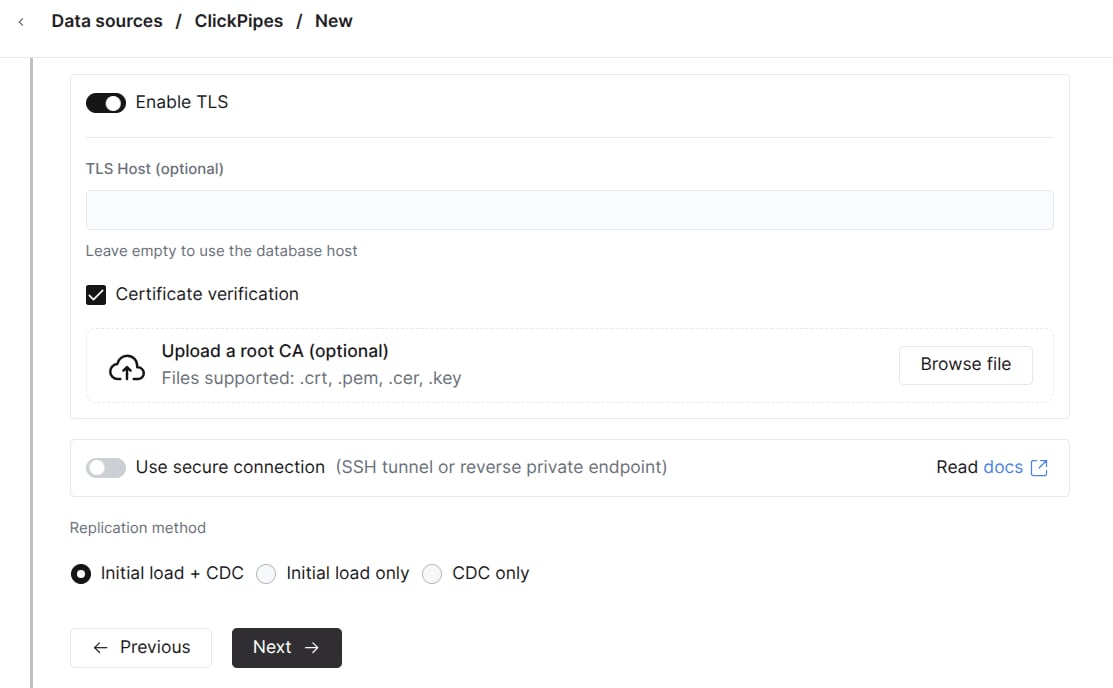
默认情况下，您的 ClickPipe 在创建时会启用 TLS 和证书验证。您可以在创建 ClickPipe 时修改这些默认设置：

<Frame>
  <img src="https://mintcdn.com/private-7c7dfe99-vortex-format/mRaTj__cZTg8Xed9/images/integrations/data-ingestion/clickpipes/postgres/tls-settings.webp?fit=max&auto=format&n=mRaTj__cZTg8Xed9&q=85&s=09e4c6fcf1d5eb91edd27fab3f37ba87" alt="TLS 设置" width="1113" height="688" data-path="images/integrations/data-ingestion/clickpipes/postgres/tls-settings.webp" />
</Frame>

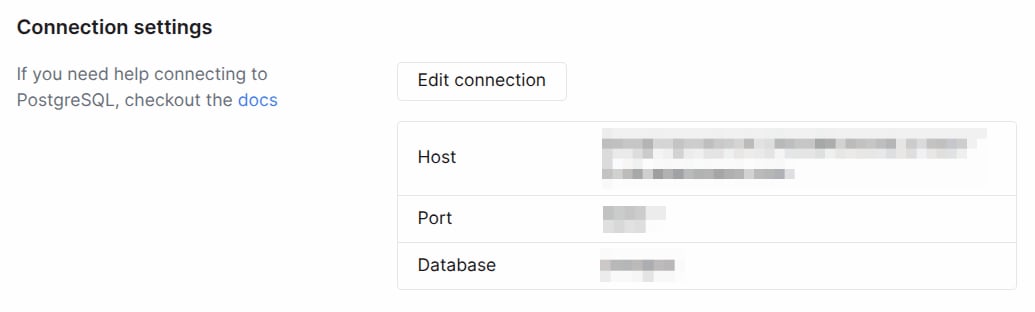
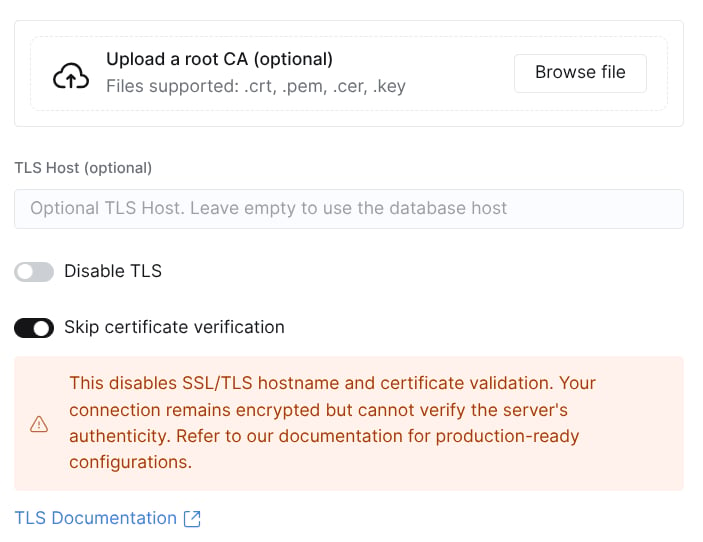
或者在已暂停的 ClickPipe 的 *Settings* 选项卡中的 *Connection settings* 部分进行编辑：

<Frame>
  <img src="https://mintcdn.com/private-7c7dfe99-vortex-format/mRaTj__cZTg8Xed9/images/integrations/data-ingestion/clickpipes/postgres/pipe-connection-settings.webp?fit=max&auto=format&n=mRaTj__cZTg8Xed9&q=85&s=a5fb793fa33061a8a5b5cc29afc177e2" alt="连接设置 -> 编辑连接" data-og-width="1035" width="1035" data-og-height="312" height="312" data-path="images/integrations/data-ingestion/clickpipes/postgres/pipe-connection-settings.webp" data-optimize="true" data-opv="3" srcset="https://mintcdn.com/private-7c7dfe99-vortex-format/mRaTj__cZTg8Xed9/images/integrations/data-ingestion/clickpipes/postgres/pipe-connection-settings.webp?w=280&fit=max&auto=format&n=mRaTj__cZTg8Xed9&q=85&s=f02d7d8ed28e30f4f74283f26462940c 280w, https://mintcdn.com/private-7c7dfe99-vortex-format/mRaTj__cZTg8Xed9/images/integrations/data-ingestion/clickpipes/postgres/pipe-connection-settings.webp?w=560&fit=max&auto=format&n=mRaTj__cZTg8Xed9&q=85&s=e0f2378d6a9156fe9bba5bfe4c725d75 560w, https://mintcdn.com/private-7c7dfe99-vortex-format/mRaTj__cZTg8Xed9/images/integrations/data-ingestion/clickpipes/postgres/pipe-connection-settings.webp?w=840&fit=max&auto=format&n=mRaTj__cZTg8Xed9&q=85&s=9ee6080b1119329406295925082e87dc 840w, https://mintcdn.com/private-7c7dfe99-vortex-format/mRaTj__cZTg8Xed9/images/integrations/data-ingestion/clickpipes/postgres/pipe-connection-settings.webp?w=1100&fit=max&auto=format&n=mRaTj__cZTg8Xed9&q=85&s=d10290c7c1f6cd643effd802ca5be674 1100w, https://mintcdn.com/private-7c7dfe99-vortex-format/mRaTj__cZTg8Xed9/images/integrations/data-ingestion/clickpipes/postgres/pipe-connection-settings.webp?w=1650&fit=max&auto=format&n=mRaTj__cZTg8Xed9&q=85&s=11fde8f4e6d917311d538e8bd78ed5bc 1650w, https://mintcdn.com/private-7c7dfe99-vortex-format/mRaTj__cZTg8Xed9/images/integrations/data-ingestion/clickpipes/postgres/pipe-connection-settings.webp?w=2500&fit=max&auto=format&n=mRaTj__cZTg8Xed9&q=85&s=16a53007292d2e8563474e630804f600 2500w" />
</Frame>

<Frame>
  <img src="https://mintcdn.com/private-7c7dfe99-vortex-format/mRaTj__cZTg8Xed9/images/integrations/data-ingestion/clickpipes/postgres/pipe-edit-connection.webp?fit=max&auto=format&n=mRaTj__cZTg8Xed9&q=85&s=01b9f1a5c007555a6f096ffe7357d11b" alt="编辑连接" width="703" height="542" data-path="images/integrations/data-ingestion/clickpipes/postgres/pipe-edit-connection.webp" />
</Frame>

说明如下：

* `Disable TLS` 用于为该连接启用或禁用 TLS。关闭 TLS 意味着数据会以明文形式通过网络传输，其中可能包含 secrets 和敏感数据。
* `Skip certificate verification` 用于启用或禁用对源数据库所提供证书的验证。请务必考虑跳过证书验证带来的安全影响。
* `TLS Host` (可选，默认为源 *Host*) 是在启用证书验证时，证书的 CN 必须匹配的 hostname。
* `Upload CA` 可用于提供在启用证书验证时使用的 CA。

<div id="optional-setting-up-ssh-tunneling">
  #### &#x20;(可选) 设置 SSH 隧道
</div>

如果你的源 Postgres 数据库无法通过公网访问，可以填写 SSH 隧道的相关信息。

1. 打开“Use SSH Tunnelling”开关。

2. 填写 SSH 连接信息。

   <Image img="https://mintcdn.com/private-7c7dfe99-vortex-format/mRaTj__cZTg8Xed9/images/integrations/data-ingestion/clickpipes/postgres/ssh-tunnel.jpg?fit=max&auto=format&n=mRaTj__cZTg8Xed9&q=85&s=32246dd5b821da001d89a9825ae2e5b4" alt="SSH 隧道" size="lg" border width="1780" height="1342" data-path="images/integrations/data-ingestion/clickpipes/postgres/ssh-tunnel.jpg" />

3. 如需使用基于密钥的身份验证，请点击“Revoke and generate key pair”生成新的密钥对，并将生成的公钥复制到 SSH 服务器上的 `~/.ssh/authorized_keys`。

4. 点击“Verify Connection”验证连接。

<Note>
  请确保在 SSH 堡垒机的防火墙规则中将 [ClickPipes IP addresses](/zh/integrations/clickpipes/home#list-of-static-ips) 加入白名单，以便 ClickPipes 能够建立 SSH 隧道。
</Note>

填写完连接信息后，点击“Next”。

<div id="configuring-the-replication-settings">
  ### 配置复制设置
</div>

5. 请确保从下拉列表中选择你在前置条件步骤中创建的 replication slot。

   <Image img="https://mintcdn.com/private-7c7dfe99-vortex-format/mRaTj__cZTg8Xed9/images/integrations/data-ingestion/clickpipes/postgres/select-replication-slot.jpg?fit=max&auto=format&n=mRaTj__cZTg8Xed9&q=85&s=902b6a4c741f1742962215d6d63d9d9e" alt="选择 replication slot" size="lg" border width="1900" height="640" data-path="images/integrations/data-ingestion/clickpipes/postgres/select-replication-slot.jpg" />

<div id="advanced-settings">
  #### 高级设置
</div>

如有需要，您可以配置高级设置。下面简要介绍各项设置：

* **同步间隔**：指 ClickPipes 轮询源数据库以检查变更的时间间隔。该设置会影响目标端 ClickHouse 服务；对于成本较为敏感的用户，建议将其设为较高的值 (高于 `3600`) 。
* **初始加载的并行线程数**：指用于拉取初始快照的并行工作线程数量。当您有大量表，并希望控制拉取初始快照时使用的并行工作线程数时，此设置会很有帮助。此设置按表生效。
* **拉取批次大小**：单个批次拉取的行数。这是一个尽力而为的设置，因此在某些情况下可能不会严格生效。
* **每个分区快照的行数**：指初始快照期间每个分区中要拉取的行数。当您的表中有大量行，并希望控制每个分区拉取的行数时，此设置会很有帮助。
* **并行快照的表数量**：指初始快照期间并行拉取的表数量。当您有大量表，并希望控制并行拉取的表数量时，此设置会很有帮助。

<div id="configuring-the-tables">
  ### 配置表
</div>

6. 在这里，您可以为 ClickPipe 选择目标端数据库。您可以选择现有数据库，也可以新建一个数据库。

   <Image img="https://mintcdn.com/private-7c7dfe99-vortex-format/mRaTj__cZTg8Xed9/images/integrations/data-ingestion/clickpipes/postgres/select-destination-db.jpg?fit=max&auto=format&n=mRaTj__cZTg8Xed9&q=85&s=25f3785b960a73d544e1b8c189e53d33" alt="选择目标端数据库" size="lg" border width="2528" height="546" data-path="images/integrations/data-ingestion/clickpipes/postgres/select-destination-db.jpg" />

7. 您可以选择要从源 Postgres 数据库复制的表。选择表时，您还可以重命名目标端 ClickHouse 数据库中的表，并排除特定列。

<Warning>
  如果您在 ClickHouse 中定义的 ordering key 与 Postgres 中的 primary key 不同，请务必阅读相关的[注意事项](/zh/integrations/clickpipes/postgres/ordering-keys)。
</Warning>

8. 此外，您还可以提供自定义的 `PARTITION BY <expr>` 表达式，以控制目标端 [ClickHouse 表分区](/zh/partitions)。

<Image img="https://mintcdn.com/private-7c7dfe99-vortex-format/mRaTj__cZTg8Xed9/images/integrations/data-ingestion/clickpipes/postgres/partition-by.png?fit=max&auto=format&n=mRaTj__cZTg8Xed9&q=85&s=9cfddaa57fa68c14e7fbffadaa60d490" alt="分区方式" size="lg" border width="897" height="635" data-path="images/integrations/data-ingestion/clickpipes/postgres/partition-by.png" />

<div id="review-permissions-and-start-the-clickpipe">
  ### 检查权限并启动 ClickPipe
</div>

8. 在权限下拉菜单中选择“完全访问”角色，然后点击“完成设置”。

   <Image img="https://mintcdn.com/private-7c7dfe99-vortex-format/mRaTj__cZTg8Xed9/images/integrations/data-ingestion/clickpipes/postgres/ch-permissions.jpg?fit=max&auto=format&n=mRaTj__cZTg8Xed9&q=85&s=a2662830bd8009b779cf6fe6fc55d183" alt="检查权限" size="lg" border width="1844" height="716" data-path="images/integrations/data-ingestion/clickpipes/postgres/ch-permissions.jpg" />

<div id="whats-next">
  ## 接下来做什么？
</div>

设置好 ClickPipe，将数据从 PostgreSQL 复制到 ClickHouse Cloud 后，你就可以重点考虑如何查询和建模数据，以获得最佳性能。请参阅[迁移指南](/zh/get-started/migrate/postgres/overview)，评估哪种策略最适合你的需求；同时也可查看[去重策略 (使用 CDC) ](/zh/integrations/clickpipes/postgres/deduplication)和[排序键](/zh/integrations/clickpipes/postgres/ordering-keys)页面，了解 CDC 工作负载的最佳实践。

如需了解有关 PostgreSQL CDC 的常见问题和故障排查信息，请参阅[Postgres 常见问题页面](/zh/integrations/clickpipes/postgres/faq)。