> ## Documentation Index
> Fetch the complete documentation index at: https://private-7c7dfe99-vortex-format.mintlify.site/llms.txt
> Use this file to discover all available pages before exploring further.

> MongoDB를 ClickHouse Cloud에 원활하게 연결하는 방법을 설명합니다.

# CDC를 사용하여 MongoDB에서 ClickHouse로 데이터 수집

export const Image = ({img, alt, size = "lg"}) => {
  const normalizedSize = ["sm", "md", "lg"].includes(size) ? size : "lg";
  return <div className={`ch-image-${normalizedSize}`}>
      <Frame>
        <img src={img} alt={alt} />
      </Frame>
    </div>;
};

export const BetaBadge = ({link, galaxyTrack, galaxyEvent}) => {
  if (link) {
    return <a href={link} target="_blank" rel="noopener noreferrer" className="betaBadge" onClick={galaxyTrack && galaxyEvent ? galaxyOnClick(galaxyEvent) : undefined}>
                <span>베타</span>
            </a>;
  }
  return <a href="/ko/reference/settings/beta-and-experimental-features#beta-features" className="betaBadge">
            <span>베타 기능</span>
        </a>;
};

<BetaBadge />

<Info>
  ClickPipes를 통해 MongoDB에서 ClickHouse Cloud로 데이터를 수집하는 기능은 현재 공개 베타입니다.
</Info>

<Note>
  ClickHouse Cloud 콘솔과 문서에서는 MongoDB의 "table"과 "collection"을 같은 의미로 혼용합니다.
</Note>

ClickPipes를 사용하면 MongoDB 데이터베이스의 데이터를 ClickHouse Cloud로 수집할 수 있습니다. 원본 MongoDB 데이터베이스는 온프레미스 환경에서 호스팅할 수도 있고, MongoDB Atlas와 같은 서비스를 사용해 클라우드에서 호스팅할 수도 있습니다.

MongoDB ClickPipes는 ClickPipes UI를 사용해 수동으로 배포하고 관리할 수 있으며, [OpenAPI](/ko/integrations/clickpipes/programmatic-access/openapi)와 [Terraform](/ko/integrations/clickpipes/programmatic-access/terraform)을 사용해 프로그래밍 방식으로도 배포하고 관리할 수 있습니다.

<div id="prerequisites">
  ## 사전 요구사항
</div>

시작하기 전에 먼저 MongoDB 데이터베이스가 복제용으로 올바르게 구성되어 있는지 확인해야 합니다. 구성 단계는 MongoDB 배포 방식에 따라 달라지므로, 아래의 해당 가이드를 따르십시오.

1. [MongoDB Atlas](/ko/integrations/clickpipes/mongodb/source/atlas)

2. [Generic MongoDB](/ko/integrations/clickpipes/mongodb/source/generic)

3. [Amazon DocumentDB](/ko/integrations/clickpipes/mongodb/source/documentdb)

원본 MongoDB 데이터베이스 설정이 완료되면 ClickPipe 생성을 계속할 수 있습니다.

<div id="create-your-clickpipe">
  ## ClickPipe 만들기
</div>

ClickHouse Cloud 계정에 로그인되어 있는지 확인하십시오. 아직 계정이 없다면 [여기](https://cloud.clickhouse.com/)에서 가입할 수 있습니다.

1. ClickHouse Cloud 콘솔에서 ClickHouse Cloud 서비스로 이동합니다.

<Image img="https://mintcdn.com/private-7c7dfe99-vortex-format/Kj4wT80mHNH7Aczn/images/integrations/data-ingestion/clickpipes/cp_service.webp?fit=max&auto=format&n=Kj4wT80mHNH7Aczn&q=85&s=28f21bdc220ebac1a2802365b87fb78c" alt="ClickPipes 서비스" size="lg" border width="1184" height="482" data-path="images/integrations/data-ingestion/clickpipes/cp_service.webp" />

2. 왼쪽 메뉴에서 `Data Sources` 버튼을 선택한 다음 "Set up a ClickPipe"를 클릭합니다.

<Image img="https://mintcdn.com/private-7c7dfe99-vortex-format/Kj4wT80mHNH7Aczn/images/integrations/data-ingestion/clickpipes/cp_step0.webp?fit=max&auto=format&n=Kj4wT80mHNH7Aczn&q=85&s=275437c400afd56e6808a20a266c9d7a" alt="가져오기 선택" size="lg" border width="2606" height="790" data-path="images/integrations/data-ingestion/clickpipes/cp_step0.webp" />

3. `MongoDB CDC` 타일을 선택합니다.

<Image img="https://mintcdn.com/private-7c7dfe99-vortex-format/Kj4wT80mHNH7Aczn/images/integrations/data-ingestion/clickpipes/mongodb/mongodb-tile.webp?fit=max&auto=format&n=Kj4wT80mHNH7Aczn&q=85&s=ba8997b18f9a18534659ec8362661eec" alt="MongoDB 선택" size="lg" border width="1802" height="986" data-path="images/integrations/data-ingestion/clickpipes/mongodb/mongodb-tile.webp" />

<div id="add-your-source-mongodb-database-connection">
  ### 원본 MongoDB 데이터베이스 연결 추가
</div>

4. 사전 준비 단계에서 구성한 원본 MongoDB 데이터베이스의 연결 정보를 입력합니다.

<Info>
  연결 정보를 추가하기 전에 방화벽 규칙에서 ClickPipes IP 주소를 허용했는지 확인하십시오. 다음 페이지에서 [ClickPipes IP 주소 목록](/ko/integrations/clickpipes/home#list-of-static-ips)을 확인할 수 있습니다.
  자세한 내용은 [이 페이지 상단](#prerequisites)에 링크된 소스 MongoDB 설정 가이드를 참조하십시오.
</Info>

<Image img="https://mintcdn.com/private-7c7dfe99-vortex-format/Kj4wT80mHNH7Aczn/images/integrations/data-ingestion/clickpipes/mongodb/mongodb-connection-details.webp?fit=max&auto=format&n=Kj4wT80mHNH7Aczn&q=85&s=9c4bb621ef0436455415ea5d0f2a33a9" alt="연결 정보 입력" size="lg" border width="1538" height="1698" data-path="images/integrations/data-ingestion/clickpipes/mongodb/mongodb-connection-details.webp" />

<div id="optional-changing-tls-settings">
  #### (선택 사항) TLS 설정 변경하기
</div>

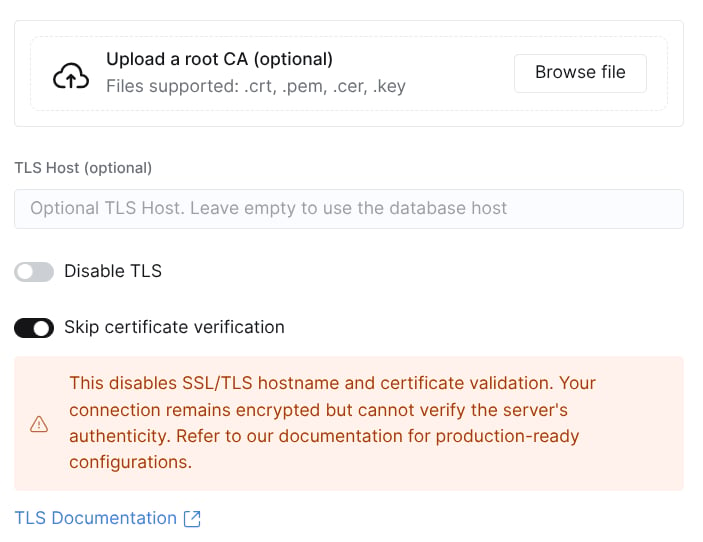
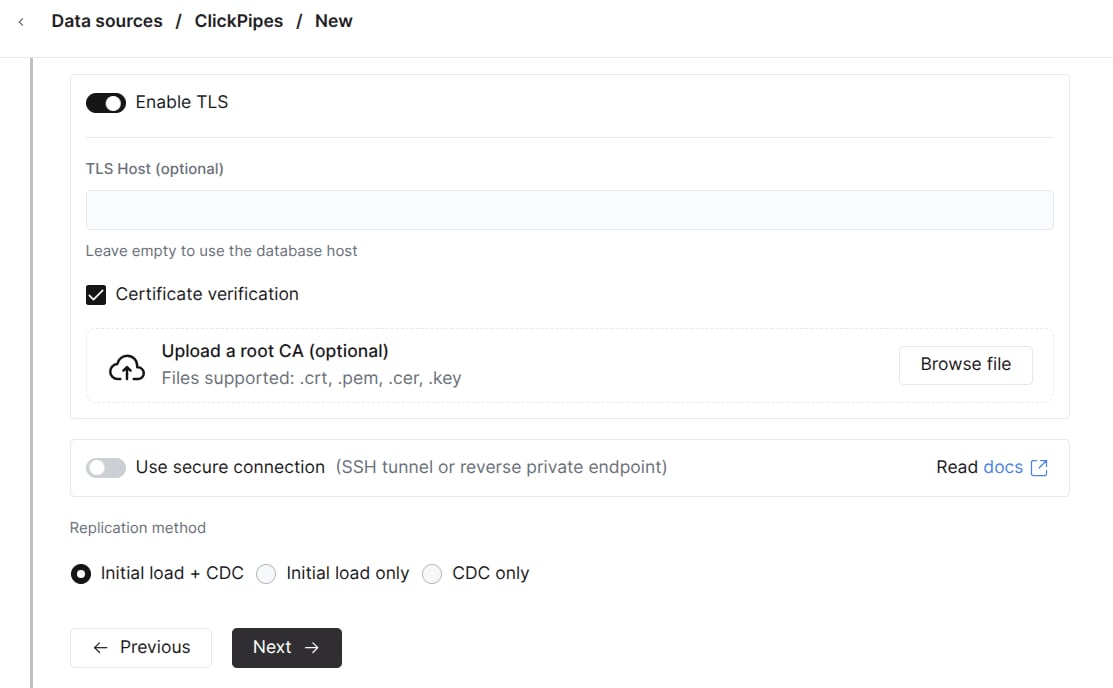
기본적으로 ClickPipe는 TLS 및 certificate verification이 활성화된 상태로 생성됩니다. 이러한 기본 설정은 ClickPipe를 생성할 때 변경할 수 있습니다:
<Frame>
  <img src="https://mintcdn.com/private-7c7dfe99-vortex-format/mRaTj__cZTg8Xed9/images/integrations/data-ingestion/clickpipes/postgres/tls-settings.webp?fit=max&auto=format&n=mRaTj__cZTg8Xed9&q=85&s=09e4c6fcf1d5eb91edd27fab3f37ba87" alt="TLS 설정" width="1113" height="688" data-path="images/integrations/data-ingestion/clickpipes/postgres/tls-settings.webp" />
</Frame>

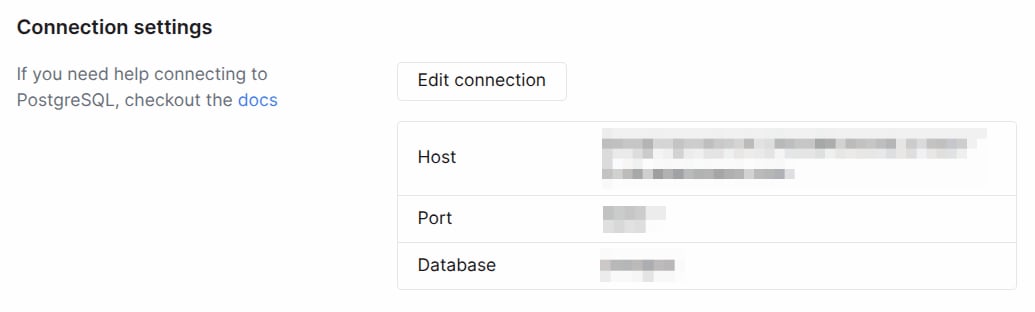
또는 일시 중지된 ClickPipe의 *설정* 탭에 있는 *연결 설정* 섹션에서 수정할 수 있습니다:
<Frame>
  <img src="https://mintcdn.com/private-7c7dfe99-vortex-format/mRaTj__cZTg8Xed9/images/integrations/data-ingestion/clickpipes/postgres/pipe-connection-settings.webp?fit=max&auto=format&n=mRaTj__cZTg8Xed9&q=85&s=a5fb793fa33061a8a5b5cc29afc177e2" alt="연결 설정 -> 연결 편집" data-og-width="1035" width="1035" data-og-height="312" height="312" data-path="images/integrations/data-ingestion/clickpipes/postgres/pipe-connection-settings.webp" data-optimize="true" data-opv="3" srcset="https://mintcdn.com/private-7c7dfe99-vortex-format/mRaTj__cZTg8Xed9/images/integrations/data-ingestion/clickpipes/postgres/pipe-connection-settings.webp?w=280&fit=max&auto=format&n=mRaTj__cZTg8Xed9&q=85&s=f02d7d8ed28e30f4f74283f26462940c 280w, https://mintcdn.com/private-7c7dfe99-vortex-format/mRaTj__cZTg8Xed9/images/integrations/data-ingestion/clickpipes/postgres/pipe-connection-settings.webp?w=560&fit=max&auto=format&n=mRaTj__cZTg8Xed9&q=85&s=e0f2378d6a9156fe9bba5bfe4c725d75 560w, https://mintcdn.com/private-7c7dfe99-vortex-format/mRaTj__cZTg8Xed9/images/integrations/data-ingestion/clickpipes/postgres/pipe-connection-settings.webp?w=840&fit=max&auto=format&n=mRaTj__cZTg8Xed9&q=85&s=9ee6080b1119329406295925082e87dc 840w, https://mintcdn.com/private-7c7dfe99-vortex-format/mRaTj__cZTg8Xed9/images/integrations/data-ingestion/clickpipes/postgres/pipe-connection-settings.webp?w=1100&fit=max&auto=format&n=mRaTj__cZTg8Xed9&q=85&s=d10290c7c1f6cd643effd802ca5be674 1100w, https://mintcdn.com/private-7c7dfe99-vortex-format/mRaTj__cZTg8Xed9/images/integrations/data-ingestion/clickpipes/postgres/pipe-connection-settings.webp?w=1650&fit=max&auto=format&n=mRaTj__cZTg8Xed9&q=85&s=11fde8f4e6d917311d538e8bd78ed5bc 1650w, https://mintcdn.com/private-7c7dfe99-vortex-format/mRaTj__cZTg8Xed9/images/integrations/data-ingestion/clickpipes/postgres/pipe-connection-settings.webp?w=2500&fit=max&auto=format&n=mRaTj__cZTg8Xed9&q=85&s=16a53007292d2e8563474e630804f600 2500w" />
</Frame>

<Frame>
  <img src="https://mintcdn.com/private-7c7dfe99-vortex-format/mRaTj__cZTg8Xed9/images/integrations/data-ingestion/clickpipes/postgres/pipe-edit-connection.webp?fit=max&auto=format&n=mRaTj__cZTg8Xed9&q=85&s=01b9f1a5c007555a6f096ffe7357d11b" alt="연결 편집" width="703" height="542" data-path="images/integrations/data-ingestion/clickpipes/postgres/pipe-edit-connection.webp" />
</Frame>

각 항목의 의미는 다음과 같습니다:

* `Disable TLS`는 연결에 대한 TLS 사용 여부를 전환합니다. TLS를 끄면 데이터가 네트워크를 통해 plaintext로 전송되며, 시크릿과 민감한 데이터가 포함될 수 있습니다.
* `Skip certificate verification`는 원본 데이터베이스가 제공하는 certificate의 검증 여부를 전환합니다. certificate verification을 건너뛸 경우의 보안 영향을 고려하십시오.
* `TLS Host`(선택 사항, 기본값은 원본 *Host*)는 certificate verification이 활성화된 경우 certificate의 CN과 일치해야 하는 호스트명입니다.
* `Upload CA`는 certificate verification이 활성화된 경우 사용할 CA를 제공하는 데 사용할 수 있습니다.

<div id="optional-set-up-ssh-tunneling">
  #### (선택 사항) SSH 터널링 설정
</div>

원본 MongoDB 데이터베이스에 공개적으로 액세스할 수 없는 경우 SSH 터널링 정보를 지정할 수 있습니다.

1. "Use SSH Tunnelling" 토글을 활성화합니다.

2. SSH 연결 정보를 입력합니다.

   <Image img="https://mintcdn.com/private-7c7dfe99-vortex-format/mRaTj__cZTg8Xed9/images/integrations/data-ingestion/clickpipes/postgres/ssh-tunnel.jpg?fit=max&auto=format&n=mRaTj__cZTg8Xed9&q=85&s=32246dd5b821da001d89a9825ae2e5b4" alt="SSH 터널링" size="lg" border width="1780" height="1342" data-path="images/integrations/data-ingestion/clickpipes/postgres/ssh-tunnel.jpg" />

3. 키 기반 인증을 사용하려면 "Revoke and generate key pair"를 클릭하여 새 키 쌍을 생성한 다음, 생성된 공개 키를 SSH 서버의 `~/.ssh/authorized_keys`에 복사합니다.

4. "Verify Connection"을 클릭하여 연결을 확인합니다.

<Note>
  ClickPipes가 SSH 터널을 설정할 수 있도록 SSH 배스천 호스트의 방화벽 규칙에서 [ClickPipes IP 주소](/ko/integrations/clickpipes/home#list-of-static-ips)를 허용해야 합니다.
</Note>

연결 정보를 모두 입력한 후 `다음`을 클릭합니다.

<div id="advanced-settings">
  #### 고급 설정 구성
</div>

필요한 경우 고급 설정을 구성할 수 있습니다. 각 설정에 대한 간단한 설명은 다음과 같습니다.

* **Sync interval**: ClickPipes가 원본 데이터베이스의 변경 사항을 폴링하는 간격입니다. 이 값은 대상 ClickHouse 서비스의 비용에 영향을 줄 수 있으므로, 비용에 민감한 경우에는 값을 더 크게(`3600` 초과) 유지하는 것이 좋습니다.
* **Pull batch size**: 단일 배치에서 가져올 행 수입니다. 이는 가능한 한 반영되는 설정이며, 모든 경우에 항상 적용되지는 않을 수 있습니다.
* **Snapshot number of tables in parallel**: 초기 스냅샷 중 병렬로 가져올 테이블 수입니다. 테이블 수가 많은 경우, 병렬로 가져오는 테이블 수를 제어하는 데 유용합니다.

<div id="configure-the-tables">
  ### 테이블 구성
</div>

5. 여기에서 ClickPipe의 대상 데이터베이스를 선택할 수 있습니다. 기존 데이터베이스를 선택하거나 새로 만들 수 있습니다.

   <Image img="https://mintcdn.com/private-7c7dfe99-vortex-format/Kj4wT80mHNH7Aczn/images/integrations/data-ingestion/clickpipes/mongodb/select-destination-db.webp?fit=max&auto=format&n=Kj4wT80mHNH7Aczn&q=85&s=187682d383c0ee78bdc21d334b6f8654" alt="대상 데이터베이스 선택" size="lg" border width="1742" height="548" data-path="images/integrations/data-ingestion/clickpipes/mongodb/select-destination-db.webp" />

6. 원본 MongoDB 데이터베이스에서 복제할 테이블을 선택할 수 있습니다. 테이블을 선택할 때 대상 ClickHouse 데이터베이스에서 테이블 이름을 변경할 수도 있습니다.

<div id="review-permissions-and-start-the-clickpipe">
  ### 권한을 검토하고 ClickPipe를 시작합니다
</div>

7. 권한 드롭다운에서 "Full access" Role을 선택한 다음 "Complete Setup"을 클릭합니다.

   <Image img="https://mintcdn.com/private-7c7dfe99-vortex-format/mRaTj__cZTg8Xed9/images/integrations/data-ingestion/clickpipes/postgres/ch-permissions.jpg?fit=max&auto=format&n=mRaTj__cZTg8Xed9&q=85&s=a2662830bd8009b779cf6fe6fc55d183" alt="권한 검토" size="lg" border width="1844" height="716" data-path="images/integrations/data-ingestion/clickpipes/postgres/ch-permissions.jpg" />

<div id="whats-next">
  ## 다음 단계는?
</div>

MongoDB에서 ClickHouse Cloud로 데이터를 복제하도록 ClickPipe를 설정했다면, 이제 최적의 성능을 위해 데이터를 쿼리하고 모델링하는 방법에 집중할 수 있습니다.

<div id="caveats">
  ## 주의사항
</div>

이 커넥터를 사용할 때 유의해야 할 몇 가지 사항은 다음과 같습니다:

* MongoDB 버전 5.1.0+가 필요합니다.
* CDC를 위해 MongoDB의 네이티브 Change Streams API를 사용하며, 이는 MongoDB oplog를 기반으로 실시간 변경 사항을 캡처합니다.
* MongoDB의 문서는 기본적으로 ClickHouse에 JSON 타입으로 복제됩니다. 이를 통해 스키마를 유연하게 관리할 수 있으며, ClickHouse의 다양한 JSON 연산자를 사용해 쿼리와 분석을 수행할 수 있습니다. JSON 데이터 쿼리에 대한 자세한 내용은 [여기](/ko/reference/data-types/newjson)에서 확인할 수 있습니다.
* 현재 셀프서비스 PrivateLink 구성은 지원되지 않습니다. AWS를 사용 중이고 PrivateLink가 필요하면 [db-integrations-support@clickhouse.com](mailto:db-integrations-support@clickhouse.com)으로 문의하거나 지원 티켓을 생성해 주십시오. 활성화할 수 있도록 지원해 드리겠습니다.