> ## Documentation Index
> Fetch the complete documentation index at: https://private-7c7dfe99-vortex-format.mintlify.site/llms.txt
> Use this file to discover all available pages before exploring further.
> Step-by-step guide on how to set up Amazon RDS MariaDB as a source for ClickPipes
# RDS MariaDB source setup guide
export const IAMAuthentication = ({engine, service, children}) => {
const services = {
aurora: {
name: 'Aurora',
resource: 'cluster',
id: 'cluster-xxxxxxxxxxxxxx'
},
rds: {
name: 'RDS',
resource: 'instance',
id: 'db-xxxxxxxxxxxxxx'
}
};
const createUserStatements = {
postgres: `CREATE USER clickpipes_iam_user;
GRANT rds_iam TO clickpipes_iam_user;`,
mysql: `CREATE USER 'clickpipes_iam_user' IDENTIFIED WITH AWSAuthenticationPlugin AS 'RDS';`
};
const svc = services[String(service).toLowerCase()];
const createUserSql = createUserStatements[String(engine).toLowerCase()];
if (!svc) throw new Error(`Unsupported IAM authentication service: ${service}`);
if (!createUserSql) throw new Error(`Unsupported IAM authentication engine: ${engine}`);
return <>
Instead of a password, you can authenticate the ClickPipes user with an AWS IAM role. This lets ClickPipes connect to your Amazon {svc.name} {svc.resource} without storing database credentials.
Enable IAM authentication
- Log in to your AWS account and go to the {svc.name} {svc.resource} you want to configure.
- Click Modify.
- Scroll to the Database authentication section.
- Select Password and IAM database authentication.
- Click Continue.
- Review the changes and select Apply immediately.
Create the ClickPipes user
Create the ClickPipes user with IAM authentication enabled, then grant it the same schema and replication privileges shown above:
{createUserSql}
{children}
Obtain the ClickHouse service IAM role ARN
- Log in to your ClickHouse Cloud account.
- Select the ClickHouse service you want to connect.
- Select the Settings tab.
- Scroll to the Network security information section at the bottom of the page.
- Copy the service's Service role ID (IAM) value, shown below.
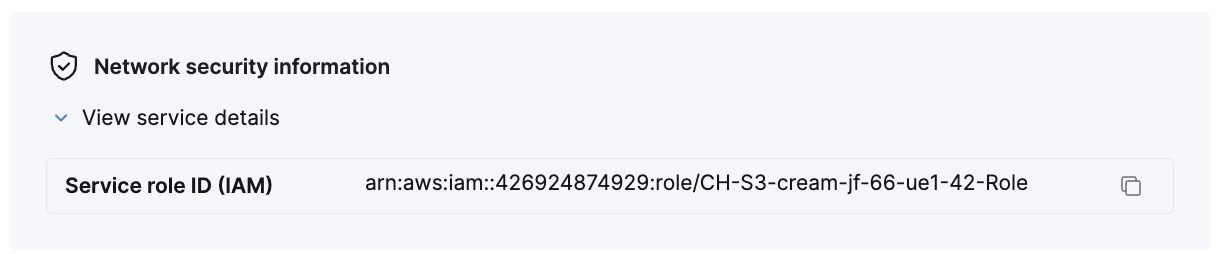
This value is your {'{ClickHouse_IAM_ARN}'} — the role ClickPipes uses to access your {svc.name} {svc.resource}.
Obtain the resource ID
- Log in to your AWS account and go to the {svc.name} {svc.resource} you want to configure.
- Select the Configuration tab.
- Note the Resource ID value — it looks like
{svc.id}. This is your {'{RDS_RESOURCE_ID}'}, which you reference in the permissions policy.
Create the IAM role
- Log in to your AWS account with an IAM user that has permission to create and manage IAM roles.
- Open the IAM console.
-
Create a new IAM role with the following trust and permissions policies.
Trust policy (replace {'{ClickHouse_IAM_ARN}'} with the IAM role ARN of your ClickHouse instance):
{`{
"Version": "2012-10-17",
"Statement": [
{
"Effect": "Allow",
"Principal": {
"AWS": "{ClickHouse_IAM_ARN}"
},
"Action": [
"sts:AssumeRole",
"sts:TagSession"
]
}
]
}`}
Permissions policy (replace {'{RDS_RESOURCE_ID}'} with the resource ID of your {svc.name} {svc.resource}, {'{RDS_REGION}'} with its region, and {'{AWS_ACCOUNT}'} with your AWS account ID):
{`{
"Version": "2012-10-17",
"Statement": [
{
"Effect": "Allow",
"Action": [
"rds-db:connect"
],
"Resource": [
"arn:aws:rds-db:{RDS_REGION}:{AWS_ACCOUNT}:dbuser:{RDS_RESOURCE_ID}/clickpipes_iam_user"
]
}
]
}`}
- Once the role is created, copy its ARN. This is your
{'{RDS_ACCESS_IAM_ROLE_ARN}'}.
You can now use this IAM role to authenticate with your {svc.name} {svc.resource} from ClickPipes.
;
};
export const Image = ({img, alt, size = "lg"}) => {
const normalizedSize = ["sm", "md", "lg"].includes(size) ? size : "lg";
return ;
};
This is a step-by-step guide on how to configure your RDS MariaDB instance for replicating its data via the MySQL ClickPipe.
We also recommend going through the MySQL FAQs [here](/integrations/clickpipes/mysql/faq). The FAQs page is being actively updated.
Enable binary log retention
The binary log is a set of log files that contain information about data modifications made to a MySQL server instance. Binary log files are required for replication. Both of the steps below must be followed:
The automated backups feature determines whether binary logging is turned on or off for MySQL. It can be set in the AWS console:
Setting backup retention to a reasonably long value depending on the replication use-case is advisable.
Amazon RDS for MariaDB has a different method of setting binlog retention duration, which is the amount of time a binlog file containing changes is kept. If some changes aren't read before the binlog file is removed, replication will be unable to continue. The default value of binlog retention hours is NULL, which means binary logs aren't retained.
To specify the number of hours to retain binary logs on a DB instance, use the mysql.rds\_set\_configuration function with a binlog retention period long enough for replication to occur. `24 hours` is the recommended minimum.
```text theme={null}
mysql=> call mysql.rds_set_configuration('binlog retention hours', 24);
```
Configure binlog settings in the parameter group
The parameter group can be found when you click on your MariaDB instance in the RDS Console, and then navigate to the `Configurations` tab.
Upon clicking on the parameter group link, you will be taken to the parameter group link page. You will see an Edit button in the top-right:
Settings `binlog_format`, `binlog_row_metadata` and `binlog_row_image` need to be set as follows:
1. `binlog_format` to `ROW`.
2. `binlog_row_metadata` to `FULL`
3. `binlog_row_image` to `FULL`
Next, click on `Save Changes` in the top-right. You may need to reboot your instance for the changes to take effect. If you see `Pending reboot` next to the parameter group link in the Configurations tab of the RDS instance, this is a good indication that a reboot of your instance is needed.
If you have a MariaDB cluster, the above parameters would be found in a [DB Cluster](https://docs.aws.amazon.com/AmazonRDS/latest/AuroraUserGuide/USER_WorkingWithParamGroups.CreatingCluster.html) parameter group and not the DB instance group.
Enabling GTID Mode
Global Transaction Identifiers (GTIDs) are unique IDs assigned to each committed transaction in MySQL/MariaDB. They simplify binlog replication and make troubleshooting more straightforward. MariaDB enables GTID mode by default, so no user action is needed to use it.
Connect to your RDS MariaDB instance as an admin user and execute the following commands:
1. Create a dedicated user for ClickPipes:
```sql theme={null}
CREATE USER 'clickpipes_user'@'host' IDENTIFIED BY 'some-password';
```
2. Grant schema permissions. The following example shows permissions for the `mysql` database. Repeat these commands for each database and host that you want to replicate:
```sql theme={null}
GRANT SELECT ON `mysql`.* TO 'clickpipes_user'@'host';
```
3. Grant replication permissions to the user:
```sql theme={null}
GRANT REPLICATION CLIENT ON *.* TO 'clickpipes_user'@'%';
GRANT REPLICATION SLAVE ON *.* TO 'clickpipes_user'@'%';
```
Using IAM authentication (optional)
AWS [introduced IAM database authentication for RDS for MariaDB in version 10.6.5](https://aws.amazon.com/blogs/database/iam-authentication-with-amazon-rds-for-mariadb/). Support depends on the exact engine version and AWS Region. Check [AWS's current supported Regions and engine versions](https://docs.aws.amazon.com/AmazonRDS/latest/UserGuide/Concepts.RDS_Fea_Regions_DB-eng.Feature.IamDatabaseAuthentication.html) before using this option.
IP-based access control
If you want to restrict traffic to your RDS instance, please add the [documented static NAT IPs](/integrations/clickpipes/networking/static-ips) to the `Inbound rules` of your RDS security group.
Private access via AWS PrivateLink
To connect to your RDS instance through a private network, you can use AWS PrivateLink. Follow our [AWS PrivateLink setup guide for ClickPipes](/resources/support-center/knowledge-base/cloud-services/aws-privatelink-setup-for-clickpipes) to set up the connection.